

Astrophotography: Everything You Need To Know
Powered by MSI
Creators are at the cutting edge of technology to push art and creation further. MSI sees the need and thrives to create the best products for video editing, photography, graphic design, and more. What creators make is wonderful, what MSI does is to make the wonder possible.
I spent a lot of my childhood staring up at the night sky. I was the kind of kid who chose space camp over sports camp, who named his dog Pluto, and carried around a space pen everywhere I went (I still have it, and yes, it still works.) A space geek, you might say.
So you can imagine that one of the first things I did when I got my first SLR was to aim it upwards.
I remember how intimidating astrophotography felt back then. But the thing is when you break it down, you can actually get some really magical shots without all kinds of crazy gear and a astronomy degree. And it’s damn fun. Below i’ll go through a series of different images that you can capture- from easy to more difficult- and i’ll list the gear needed and possible challenges for each. Follow along and you’ll be a veritable Galileo in no time.

Solar Eclipse, Oregon
The Basics
But first, let’s go over some basics that apply to pretty much any sort of astrophotography.
You Will Always Need a Tripod
Most celestial objects are pretty dim from our point of view on earth, and will require long exposures. There is no way around that. And even when shooting brighter objects like a full moon, you might not need shutter speeds that are as long, but you’ll be using a long telephoto lens through which even the slighest movement will amplify and cause blur.
Set Your Camera to Timer Mode
Pretty much all cameras have this option. Even just pushing down the shutter button introduces enough movement into your shot to make it less sharp. Don’t risk it. Either get yourself a remote trigger, or just choose the timer delay on your camera.
Even further: you should definitely turn on your mirror lock if that’s an option. Most SLRs are able to do this. Essentially, under normal circumstances, there is a mirror that reflects light into your viewfinder. That mirror swings in and out when the shutter opens to take the photo. Even this slight motion can effect your image. So check out your camera features- chances are somewhere in the menu is a mirror lock option. Turn it on when doing astrophotography.
Newer mirrorless cameras obviously don’t have this feature, as they don’t have mirrors. But they do sometimes have something called electronic first curtain shooting. For our purposes, you can imagine that this is the same thing as a mirror lock. Turn it on.
And that’s all we need to start shooting! Let’s go.
Santiago, Chile
The Moon
Gear: Camera, Tripod, Telephoto Lens (optional), lens doubler (optional)
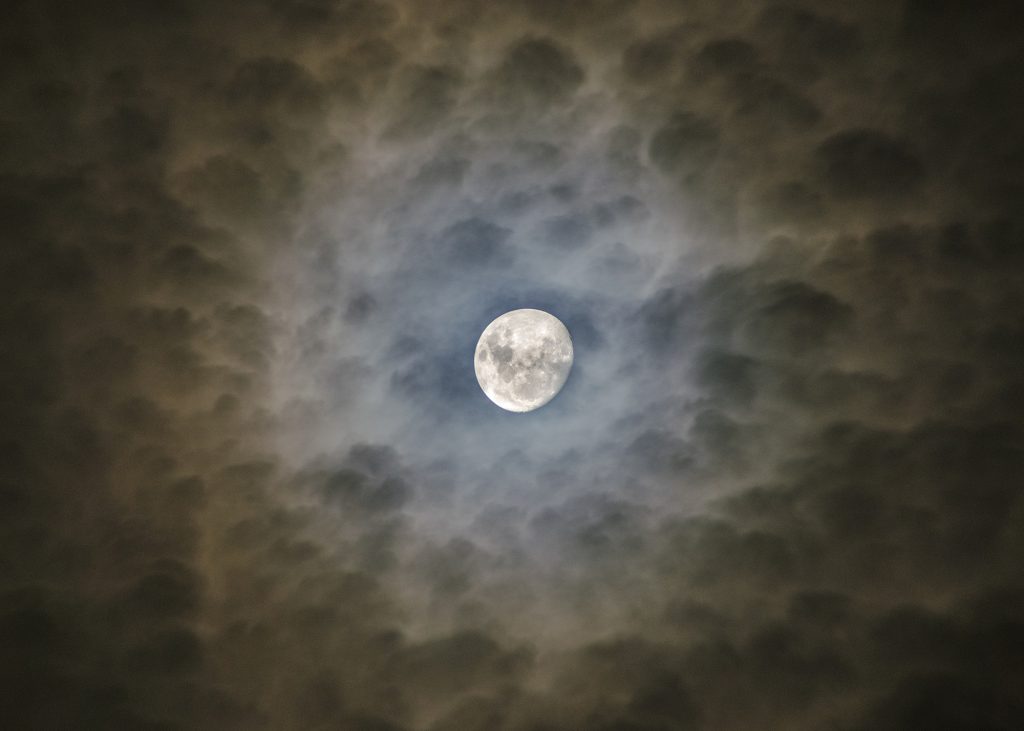
Let’s start with the most obvious- the moon. It shouldn’t be surprising that this is the easiest subject as far as astrophotography goes. Look up on a clear evening, and even with your just naked eyes you can make out details of the moons surface.
So how do you capture it in a photo? It’s as simple as setting your camera up on a tripod and pointing at it. It’s a good idea to have a telephoto lens for this, and as you’ll see below that doesn’t have to be a big cost. But even without one, you’re not left in the dark, so to speak. You can shoot the moon with nearly any lens, it just depends on how much detail you hope to get.
I shot the image below on a regular zoom lens. That may not allow me to get in close on details of the lunar surface, but it does allow me to place the moon in the context of a landscape, which can be even more interesting than just a close up.
There are two important tricks to getting a good landscape moon shot like this: you need to shoot the moon when it’s low on the horizon. Once it’s too high in the sky, on a wide lens, the distance between your landscape subject and the moon will be too great for an interesting shot. There are some really great (and free!) moon trajectory apps for your smartphone that can help you with this. Use them.
The other thing is your landscape subject will certainly require a long exposure, whereas the moon is so bright that this same exposure time will overexpose it. So you will need to shoot different exposures and stack them in photoshop.
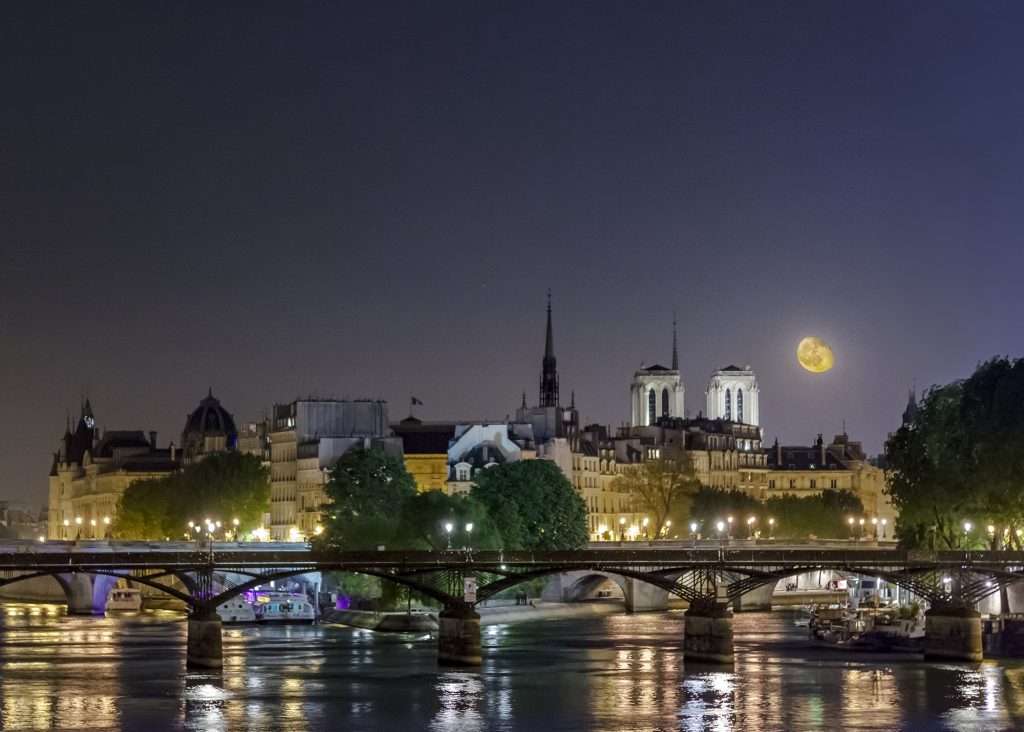
Paris, France
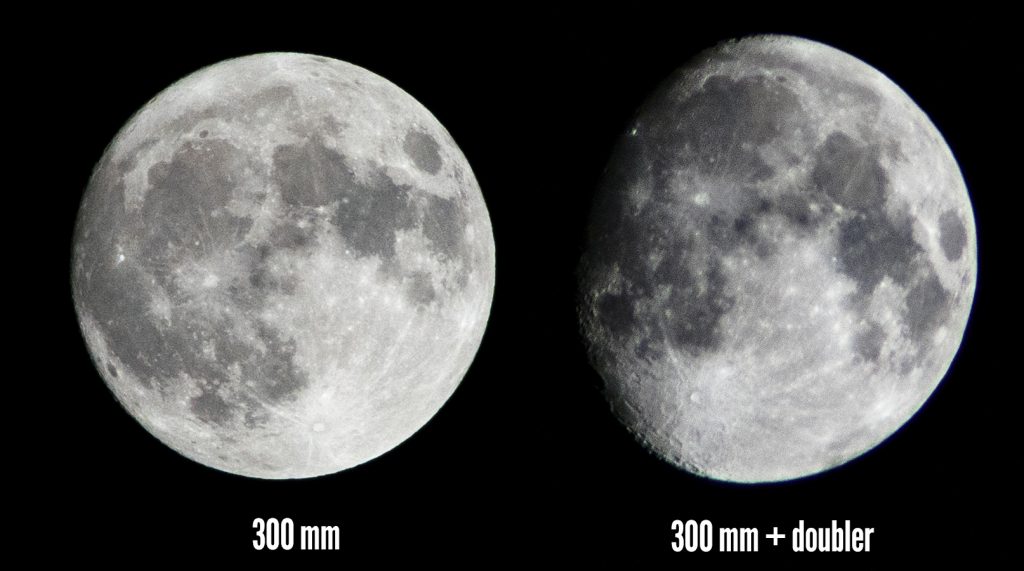
But what if you want a more NASA inspired close up of the moon? For that, you’ll obviously need a telephoto lens- but that doesn’t mean you need a costly pro lens. The telephoto lens i’m using here is almost embarassingly cheap – it is the Canon EF 75-300mm f/4-5.6 stock lens that came with the t2i I bought almost a decade ago. It is worth a grand total of $179. But it does the trick!
A good tip when using cheaper glass though is to close the aperture if you can get away with it. All lenses are sharper in the f/7 – f/8 range than they are fully open. And with a lens this cheap, i’ll take any extra sharpness. Luckily, the moon tends to be really bright – you’ll probably be surprised by how much you need to bring down the exposure in order to see the surface details. Another nice side effect of this is it’s really easy to focus on!
Below are two shots of the moon. The one on the left I took at 300mm on my lens. The one on the right I used a lens doubler for, so it’s technically at 600mm. A lens doubler is essentially a cheap way to get more zoom – rather than buy a longer telephoto, you can attach an adapter and it doubles your zoom length.
A few caveats, though: yes it doubles your zoom, but it also cuts your light in half. So if your camera is set at f/5.6 and you add a doubler, you’re now at f/8. You can always extend your exposure time to compensate for this, but remember that you’re now twice as zoomed in so camera shake is twice as bad. And it’s really hard to shoot a 10 second exposure that zoomed in without any camera shake, even in the most ideal conditions.
The other issue is lens doublers can reduce your sharpness a bit. So it really ends up being a question of compromises. On the right image, shot with the doubler, you can certainly see more detail, but you’ll also notice on the rim of the moon on the right there is a bit of a halo caused by the adaptor.
That being said, just the fact that you can step outside and take a photo of the moon with enough resolution to see the impact craters is pretty magical, no matter which way you go.
The Sun
Gear: Camera, Tripod, Telephoto Lens, Doubler (optional), Solar Filter (necessary unless you’re in the totality of an eclipse!)
The sun is about the same size in the sky as the moon appears from from earth. The one difference, of course, it’s way way brighter. So photographing the sun is a lot like shooting the moon, with the added challenge of dealing with all that light.
It’s most interesting to shoot the sun during certain astronomical events – the recent solar eclipse comes to mind (more on that below). But even just on a regular day, it’s fun to get a photo of the giant ball of fire and get to examine it without burning holes in your retina. On the image below, you can even see a few darker spots around the middle- that’s not dirt on the sensor, those are sun spots!
The only difference when it comes to shooting the sun instead of the moon is that you absolutely need a solar filter. A solar filter is essentially a super thick ND filter that cuts out all but a tiny fraction of light. That’s just how bright the sun is – if you don’t use one, your camera sensor will burn just as your eyes would if you stared right at the sun. Luckily, they are cheap. Like, $10 cheap. So pick one up, put it on your telephoto, aim it at the sun and shoot!
IMPORTANT: Keep in mind that you should never, ever look right at the sun. You can only look through your camera viewfinder at the sun if you have a solar filter on and your camera has a TTL (through the lens) viewfinder. To look at the sun in any other circumstance, get yourself solar eclipse glasses. They come in handy year round!
The one exception to the above rule is during the totality of a solar eclipse. That means the moment where the moon is totally in front of the sun, blocking out all but the corona of the sun. For the brief few minutes that you’re in the moon’s shadow, you can look at and photograph the sun without a solar filter.
In this context, there’s very little difference technically versus shooting the moon. Use a tripod, telephoto lens, timer and mirror lock. I was lucky enough to be able to get myself to the totality path during the most recent eclipse, and got the below photo on that same cheap-o telephoto, with lens doubler.
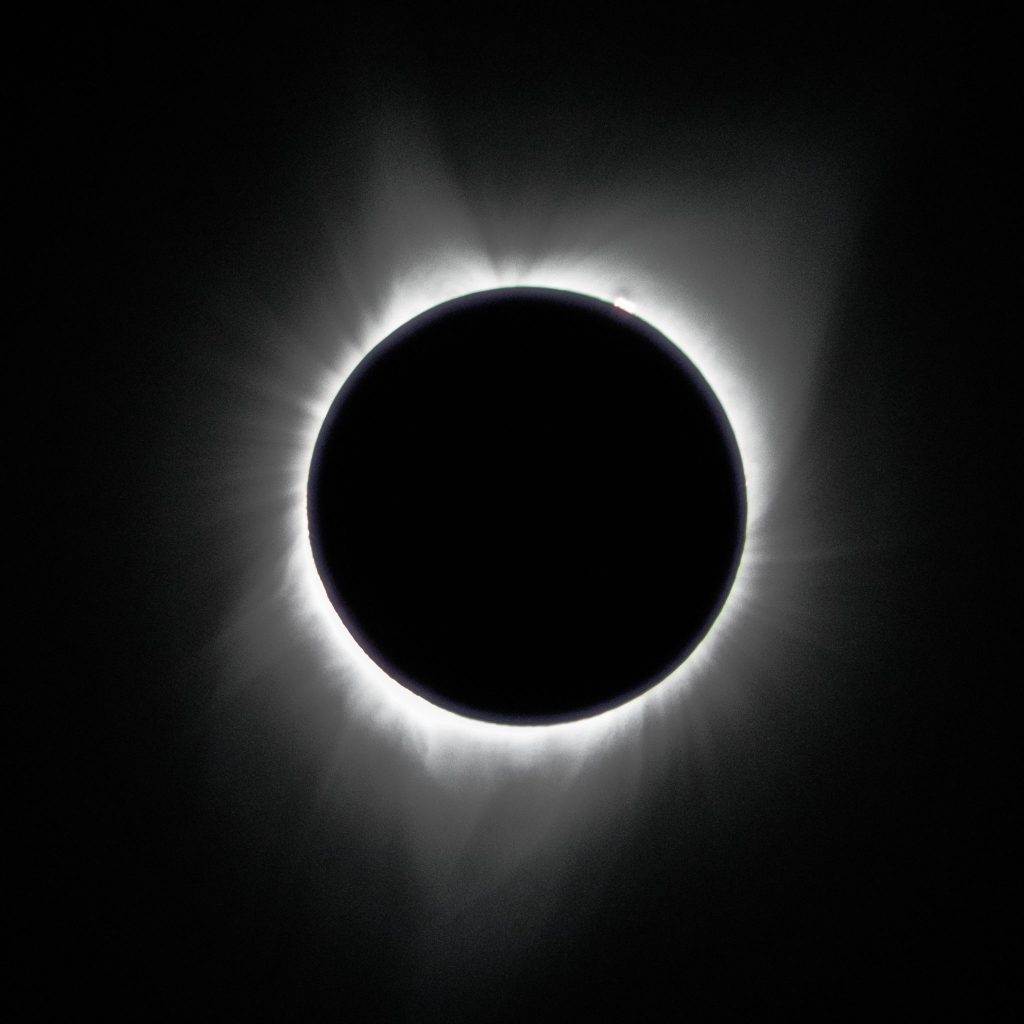
Moment of Totality, 2017 Eclipse
The Milky Way
Gear: Tripod, Wide Lens (at least f/4, ideally f/2.8)
Shooting the Milky Way has become a very popular subject in astrophotography. Instagram is full of really incredible shots showing our galaxy across the night sky. And why not? There are few things more magical that seeing our home galaxy appear on your camera’s lcd screen.
The main challenges of capturing the Milky Way is that it’s very dim, and that it moves fairly quick. So it’s all about balancing the longest exposure so you can get the most light, while minimizing the risk of getting motion blur from the movement of the stars. This is why you need a fast lens. You also need a wide lens, because the Milky Way is huge. Ideally something around the 20mm or lower range.
I just recently got a Rokinon 14mm 2.8 specifically for this purpose- but i’ve not yet had a chance to get out to somewhere where I can photograph the night sky. That’s the third variable here: you need somewhere with a dark, clear sky away from light pollution.
So, as before, set your camera on it’s tripod, point it at the Milky Way. Sometimes it’s easier to figure out where your lens’s true infinity point is for focus before hand in daylight, because it can be really tough to focus on dim stars. Then open your fstop as much as possible, and crank up your exposure time. You don’t want to exceed 15 seconds, because you’ll start to get star trails. Set your ISO as high as your camera can handle without introducing too much noise, and shoot on timer. Voila.
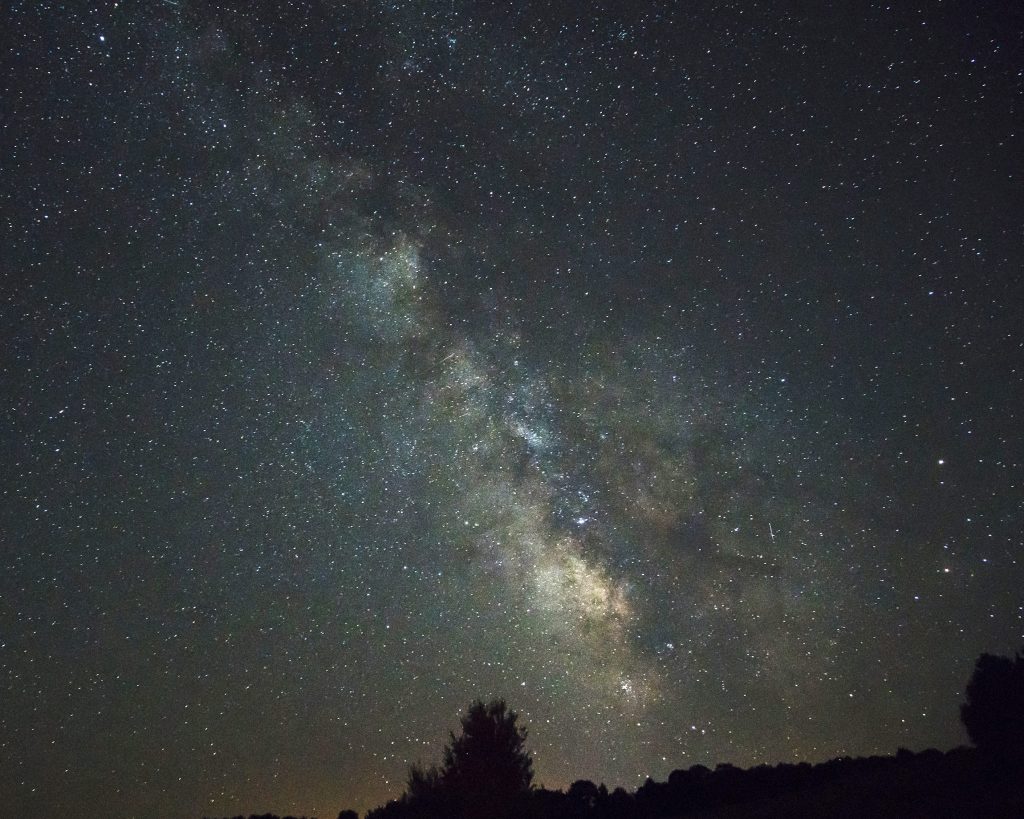
The Milky Way, Quebec
Now the above photo is not a perfect example of Milky Way photography. I shot this before I had an ideal lens (this was at f/4), in a less than ideal location, and before I learnt about the amazing technique of image stacking. But it just goes to show how easy it is to jump into this. Curious about image stacking? Read on.
Other Galaxies
Gear: Tripod, Medium Telephoto Lens
You might not believe that it’s possible to photograph other galaxies (as in, outside of the Milky Way) without a telescope, from earth. I sure didn’t. But it’s totally doable- though to be fair, you do need to be in a nearly perfect setting for it. The image below shows the Large Magellanic Cloud, a galaxy 163,000 light-years away that contains 3 billion stars. Pretty insane.
This particular galaxy is only visible from the Southern Hemisphere. So step one is to get south of the equator. The next challenge is that other galaxies are very, very far away, therefore very, very dim. So you need to get to somewhere with nearly no light pollution. I was in the Atacama desert in Chile, the highest elevation desert in the world, and one of the best places anywhere to see the night sky. Though, to be fair, I was in a town when I took this (thus the electrical pole) so you can get away with not being in pitch blackness.
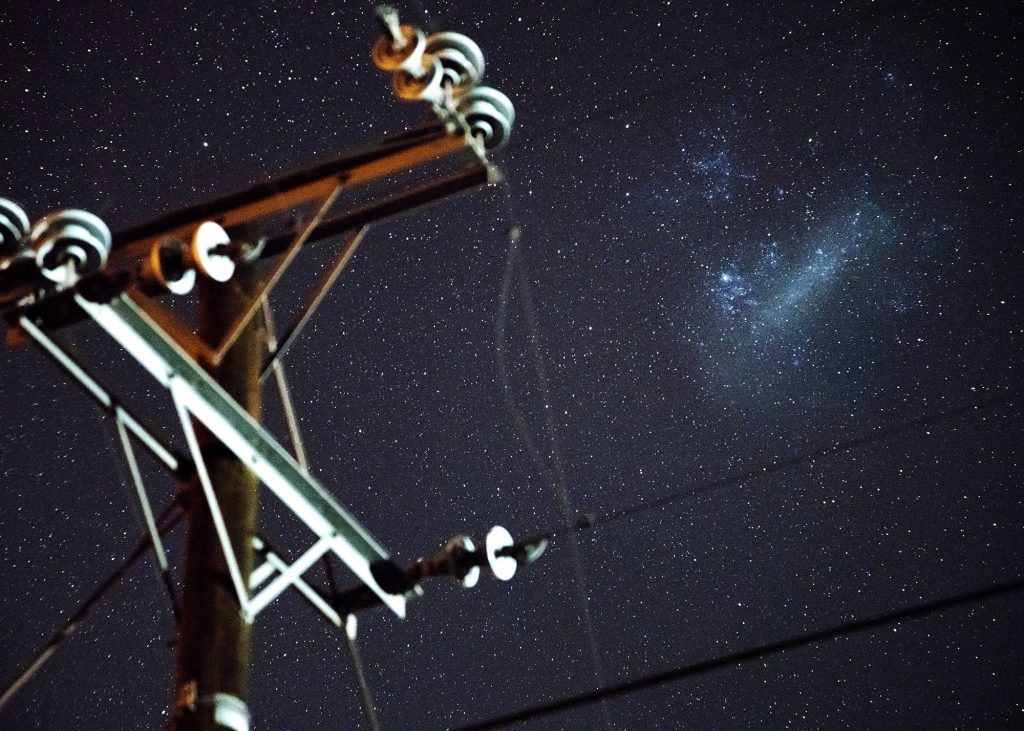
Large Magellanic Cloud over the Atacama Desert, Chile
Actually shooting the image is pretty similar to capturing the Milky Way. Except, from our vantage point, other galaxies aren’t so big. So you need to zoom in on the area of the sky where they are. And they’re not as bright, so you’ll have to crank that ISO further than you might be comfortable with. But fear not! We still have a trick up our sleeves to counter all that ISO noise.
You may be familiar with the very common technique of image stacking for long exposures. Basically- both high ISOs and long exposures tend to introduce sensor noise in your image. But, if you can take several long exposures, you can use photoshop to stack the images together and average out the noise. This is all great and good, except it’s not so easy with astrophotography. The stars move quickly, so even if you take shots pretty close together, the stars will not be in the same place and you won’t be able to just stack them as is.
Luckily, software exists that takes care of this problem. I use Starry Landscape Tracker. It does the same thing photoshop would- average out the noise in the darks between several shots – but it also tracks where the stars are and does a great job of realigning the images.
So, to recap: get your camera on a tripod, zoom in on the specific spot in the sky, shoot many images as bright as possible without getting star trails, and then use software to bring down the noise! Voila.
Hopefully this information has helped demystify astrophotography for you. Though, as always, the best advice is to go out and try it! Shoot, shoot, shoot. It may take some time to get the results you want, but that’s part of the fun, isn’t it?
Good shooting!
Powered by MSI
Creators are at the cutting edge of technology to push art and creation further. MSI sees the need and thrives to create the best products for video editing, photography, graphic design, and more. What creators make is wonderful, what MSI does is to make the wonder possible.